Data Profiler using Unity Catalog
In this topic we will describe how to create a data quality pipeline with data from Unity Catalog data lake using Unity Catalog enabled data quality nodes and adding the data into a Databricks Unity Catalog data lake. The data lake that you use can either be the same for source and target nodes or it can be different.
Prerequisites
You must complete the following prerequisites before creating a data profiler job:
-
The data quality nodes have specific requirements as far as the Databricks Runtime version of the cluster and access mode is concerned. Following are the requirements for Unity Catalog-enabled Databricks used as a data profiler node in the data pipeline:
Data Quality Node Databricks Cluster Runtime Version Access Mode Data Profiler 12.2 LTS Dedicated
-
Access to a Databricks Unity Catalog node which will be used as a data lake in the data ingestion pipeline.
Creating a data profiler job
-
On the home page of Data Pipeline Studio, add the following stages:
-
Data Quality (Databricks - Unity Catalog enabled)
-
Data Lake (Databricks Unity Catalog)
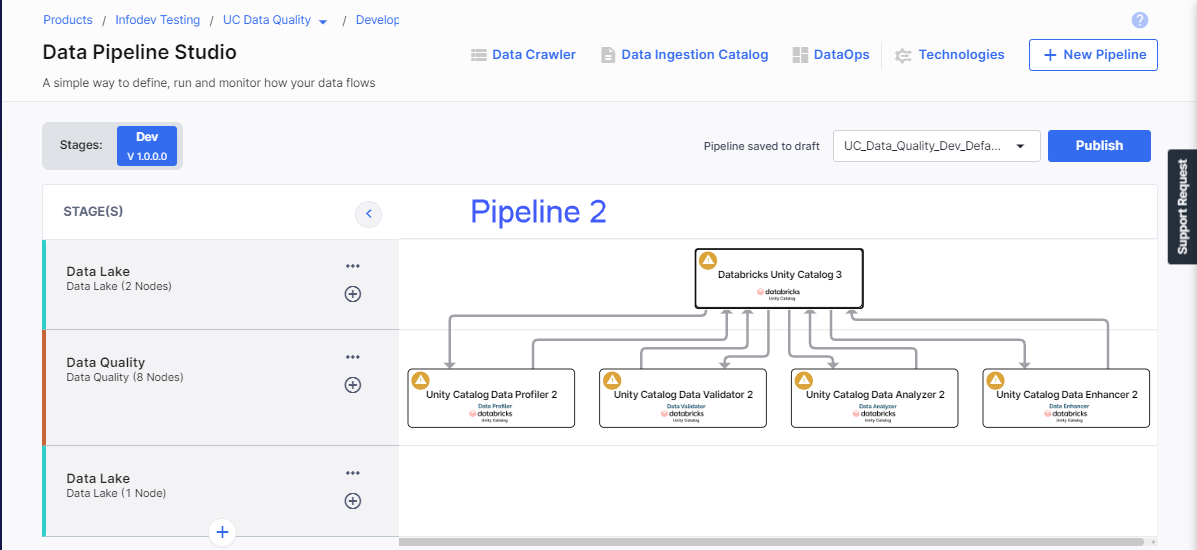
For the sake of example, two pipelines are shown below:
-
Pipeline 1 which uses 2 different Unity Catalog data lake nodes as source and target, and data quality nodes.
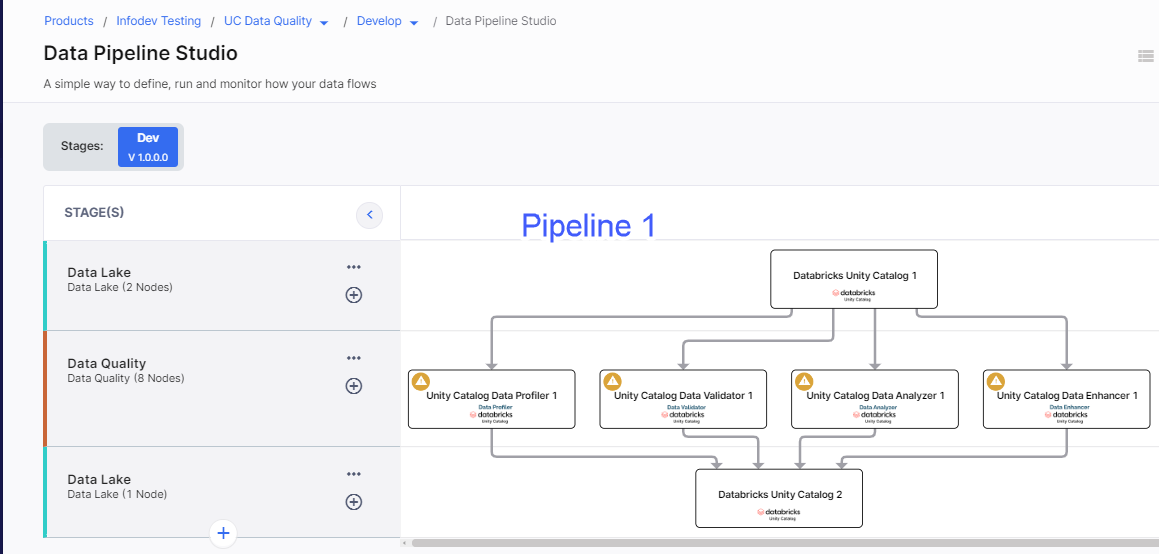
-
Pipeline 2 which uses the same Unity Catalog data lake node as source and target, and data quality nodes.
-
- Configure the data lake nodes. Do the following:
- The catalog name and workspace are selected. To edit the details, click the ellipsis (...) and select the required options.
- Select the required schema.
- Click the dropdown arrow in Data Browsing to check the data in the source.
-
Click the Unity Catalog node for data profiler in the data quality stage. On the Unity Catalog Profiler Job tab, click Create Job. Complete the following steps to create the job:
 Job Name
Provide job details for the data profiler job:
-
Template - Based on the source and destination that you choose in the data pipeline, the template is automatically selected.
-
Job Name - Provide a name for the data profiler job.
-
Node rerun Attempts - Specify the number of times the pipeline rerun is attempted on this node of the pipeline, in case of failure. The default setting is done at the pipeline level. You can change the rerun attempts by selecting 1, 2, or 3.
Source
-
Source - This is automatically selected depending on the data lake node configured and added in the pipeline.
-
Datastore - The configured datastore that you added in the data pipeline is displayed.
-
Catalog Name -The catalog which is associated with the workspace of the configured datastore.
-
Schema Name - The schema associated with the catalog. The schema is selected based on the catalog, but you can select a different schema.
-
Source Table - Select a table from the selected datastore.
-
Columns - Click the dropdown and select the required columns.
-
Records from File - Select a sample of records to be processed by the profiler job. Selecting one of the following options:
-
Percentage - Provide a percentage of the total number of records to be processed by the profiler job.
-
Number of Records - Provide a number of the records that are to be processed by the profiler job.
-
-
Seed Value - A value that controls the sampling of records. Seed value generates the same sample dataset each time the job is run. Each seed value creates a sample dataset.
-
Profiler Constraints - Select the constraints on which you want the data profiler job to run.

Note:
If you select Validity constraint, you must provide a regular expression. For example - NumbersOnly, LettersOnly, Numbers, Letters and so on.
Click Add. If you want to edit the selected constraints or delete constraints, click the ellipsis (...) and click Edit or Delete.
Click Next.
Target
-
Target - The data lake that was configured for the target.
-
Datastore - The datastore that you configured for the Databricks Unity Catalog is auto-populated.
-
Catalog Name - The catalog name that is associated with the Unity Catalog instance, is auto-populated.
-
Schema - The schema that is selected for the Unity Catalog instance is auto-populated. If required you can change the schema at this stage.
-
Map source data to target tables - Map the source file with a table in the target. You can either map an existing table or create a new table and map it.
Do one of the following:
-
Source - Select a table from the dropdown.
-
Target - Select a table from the dropdown. Else type a name for a new table and click Click to create "table name".
-
Click Add Mapped Tables. To delete a mapping click the ellipsis (...) and then click Delete.
Click Next.
Cluster Configuration
You can select an all-purpose cluster or a job cluster to run the configured job.
In case your Databricks cluster is not created through the Calibo Accelerate platform and you want to update custom environment variables, refer to the following:
Updating Custom Variables for a Databricks Cluster
All Purpose Clusters
Cluster - Select the all-purpose cluster that you want to use for the data quality job, from the dropdown list.
Job Cluster
Cluster Details Description Choose Cluster Provide a name for the job cluster that you want to create. Job Configuration Name Provide a name for the job cluster configuration. Databricks Runtime Version Select the appropriate Databricks version. Worker Type Select the worker type for the job cluster. Workers Enter the number of workers to be used for running the job in the job cluster.
You can either have a fixed number of workers or you can choose autoscaling.
Enable Autoscaling Autoscaling helps in scaling up or down the number of workers within the range specified by you. This helps in reallocating workers to a job during its compute-intensive phase. Once the compute requirement reduces the excess number of workers are removed. This helps control your resource costs. Cloud Infrastructure Details First on Demand Provide the number of cluster nodes that are marked as first_on_demand.
The first_on_demand nodes of the cluster are placed on on-demand instances.
Availability Choose the type of EC2 instances to launch your Apache Spark clusters, from the following options:
-
Spot
-
On-demand
-
Spot with fallback
Zone Identifier of the availability zone or data center in which the cluster resides.
The provided availability zone must be in the same region as the Databricks deployment.
Instance Profile ARN Provide an instance profile ARN that can access the target Amazon S3 bucket. EBS Volume Type The type of EBS volume that is launched with this cluster. EBS Volume Count The number of volumes launched for each instance of the cluster. EBS Volume Size The size of the EBS volume to be used for the cluster. Additional Details Spark Config To fine tune Spark jobs, provide custom Spark configuration properties in key value pairs. Environment Variables Configure custom environment variables that you can use in init scripts. Logging Path (DBFS Only) Provide the logging path to deliver the logs for the Spark jobs. Init Scripts Provide the init or initialization scripts that run during the start up of each cluster. Notifications
You can configure the SQS and SNS services to send notifications related to the node in this job. This provides information about various events related to the node without actually connecting to the Calibo Accelerate platform.
SQS and SNS Configurations - Select an SQS or SNS configuration that is integrated with the Calibo Accelerate platform. Events - Enable the events for which you want to enable notifications:
-
Select All
-
Node Execution Failed
-
Node Execution Succeeded
-
Node Execution Running
-
Node Execution Rejected
Event Details - Select the details of the events from the dropdown list, that you want to include in the notifications. Additional Parameters - Provide any additional parameters that are to be added in the SQS and SNS notifications. A sample JSON is provided, you can use this to write logic for processing the events. -